Every ATV rider knows when it’s time to replace tires. But there’s an equally important part that works just as hard and needs just as much attention. When wheel bearings go bad, there’s a lot of issues that can pop up.
If you want to keep your ATV running the best you can, learning the signs of a bad wheel bearing and how to replace it is key. We’re covering the most important info about ATV wheel bearings, how to find them, the signs of wear, and what you need to replace them.
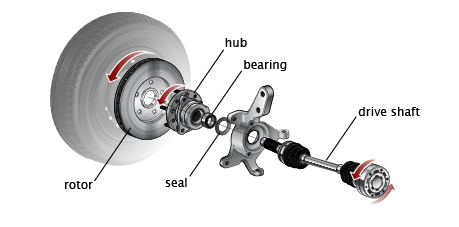
What is a wheel bearing?
Short story: it’s a buffer between the wheel and the axle. Located deep inside the steering knuckle, the wheel bearing is what lets the wheel rotate without transferring friction from the axle to the wheel. Without it, the axle would rub against the mounting hub of the wheel and eventually wear down both.

What happens when ATV wheel bearings break?
When wheel bearings break down and stop working, they cause extra and uneven wear on tires and brakes. They put undue stress on other parts as well. Tie rod ends, bushings, and ball joints are all affected by a shot wheel bearing.
How does a bad wheel bearing affect handling?
A loose or broken wheel bearing will cause the wheels to shift, make noise, and rub where they shouldn’t on uneven trails or tight turns. It’s important to be able to know the signs of bad ATV wheel bearings before you ride to avoid any safety issues or costly repairs.

Symptoms of Bad ATV Wheel Bearings
It’s true you can lift your ATV, remove the wheels, and inspect the bearings directly. Most likely, however, you’re going to realize they’ve gone bad while you’re riding. Here are the signs you should replace your wheel bearings:
- Wobbling tires. If your tires are wobbling from side to side when you ride, this is a sign your wheel bearings are in really bad shape. Not only is it unsafe, but it can also cause damage to other parts of your ATV’s suspension, drivetrain, etc.
- Clicking sound when taking tight corners. If your ATV’s wheel bearings are loose, the pressure put on the bearings from a shift of momentum and inertia causes a very audible and recognizable click.
- Noisy, rumbling sound when in a straight line. If the bearings are really on their last legs, you’ll notice the rumbling even in a straight line. You can be sure it’s the bearings if the sound intensifies when you veer your ATV left or right
- ATV pulls to one side when braking. An ATV with bad wheel bearings will pull to the side of the most worn ones slowing first when you hit the brakes. Even after you’ve slowed down and let off the brake, it may still drift.
- Uneven wear on tires. This could be a symptom of alignment issues, but it may certainly be the ATV’s wheel bearings as well. If you’re experiencing any of these other symptoms alongside uneven tire wear, it’s time to replace your ATV’s wheel bearings.
No one wants to have to tow their ATV out of the woods because they ignored some simple maintenance or an easy repair. If you notice any of these symptoms in combination with each other while you ride, it’s important to take it easy on the trails. When you get back to the garage, make checking your wheel bearings a top priority.
How to Check ATV Wheel Bearings
It’s no fun finding out halfway into a 20-mile trail ride that your wheel bearings are on their deathbed. It’s a good idea to check your wheel bearings any time you’re doing regular upkeep. Here’s how it’s done:
- Lift your ATV off the ground completely so the wheels aren’t in contact with the ground.
- Grab the top of your wheel, and try to move the wheel in towards the chassis and out again. It’s very important to make sure you’re grabbing the wheel from the top. If the wheel wiggles when you grab it from anywhere else, it’s an issue with your tie rods.
- If the wheel is able to wiggle when grabbed from the top, it’s time you replaced your wheel bearings.
How often should you check ATV wheel bearings?
If you’re staying out of the mud, riding even trails, and not submerging your ATV in water, you might be okay with checking less often, even on a quarterly basis. If you’re riding hard, crawling rocks, and gunning it through puddles and water, your checks should be more frequent. Many riders check their ATV wheel bearings monthly.
If you followed the steps above, and you’re realizing it might be time to replace, you’re going to need to get to them. Even if you’re just doing regular maintenance and greasing the bearings, the steps to finding them are helpful.
Finding and replacing ATV wheel bearings
- Lift your ATV wheel off of the ground on a level surface using a jack.
- Remove the ATV wheel from the axle.
- Remove the brake caliper by undoing the 2-4 bolts holding it on.
- Remove the cotter pin and nut from the hub.
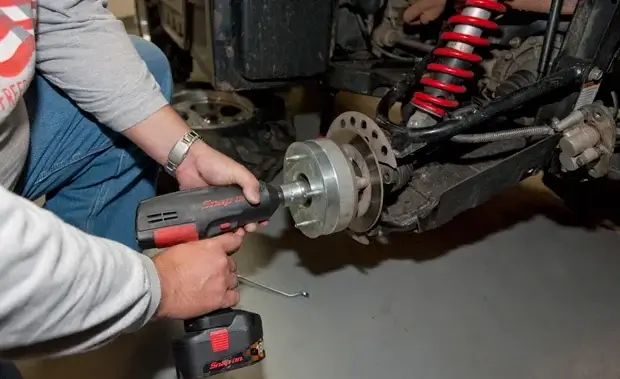
- An impact driver will work best.
- Slide off the hub with the brake rotor attached.
- Remove brake guards.
- 2-3 bolts depending on model.
- Remove cotter pins and nuts from the upper and lower ball joints.
- Use two wrenches to disconnect your tie rod end, pushing the tie rod out of the way.
- Remove the bottom bolt from the shock absorber assembly, and move it up and out of the way as well.
- Remove the steering knuckle assembly.
- This might require a bit of “elbow grease” to ease it off.
- With the steering knuckle removed, use a screwdriver, or air chisel to remove the wheel bearing from the inside.
- Sometimes, it falls out on its own, and sometimes it takes more muscle.
- With the old bearing removed, insert the new bearing into the steering knuckle.
- There are tools called bearing presses designed for this, but it’s not 100% necessary.
- You can place a large socket of about the same size as your bearing on top, and use a mallet to hit the socket, driving the bearing into place.
- Now that it’s in, reverse the steps above to re-assemble your ATV.
Every ATV is different, and getting to the wheel bearings can be different as well. Be sure to check your vehicle’s manual first before removing any parts. If you’re looking for a more visual explanation, check YouTube.
How Long Can You Drive on Bad Wheel Bearings?
That depends on how much you’re willing to spend on replacement parts.
If you replace them as soon as you can, you’re only going to have to pay for the bearings. If you wait until the end of the riding season, or even a year, you should be prepared to pay more for the parts that suffered, like ball joints, tires, bushings, etc.
Whether they’re barely broken or badly broken, riding on spent ATV bearings causes other problems. It’s an important part of your vehicle that’s under almost constant pressure. When it goes bad, tires wear unevenly, knuckles sag, and suspensions take on extra wear.
When Should You Replace Your ATV Wheel Bearings?
ATV wheel bearings are built to take a beating—but they are one of the most common “wear” parts that need replacing. Depending on how you ride, they could last multiple years. More aggressive riders may need to replace wheel bearings halfway through the riding season.
How do you make wheel bearings last longer?
You can extend the life of your ATV wheel bearings if you regularly grease them.
The dust, gunk, and grime that gets inside the bearing housing cause bearings to age faster. For particularly dusty, muddy, wet, or silty conditions, it’s a good idea to grease the wheel bearings often—sometimes even monthly.
All-in-all, even if you’re not seeing any symptoms of wheel bearing wear, It’s a good idea to replace the wheel bearings at the start of the season or whenever you tune up your ATV. They’re designed to last long, but not forever.
What Tools and Equipment Do You Need to Replace Wheel Bearings?
Luckily, the process of replacing ATV wheel bearings is easy enough and doesn’t require too many unique tools. Here’s a bare-bones list of what you’ll need for a DIY ATV wheel bearing replacement:
- Bearing/seal kit. Of course, you need the bearings, but the seal is hugely important as well. Seals cover the interior of the bearing to keep grime, dust, and dirt out of its internal housing. High Lifter has a variety available for almost every ATV make and model.
- Jack/lift. You’re going to need the wheel completely off the ground, and a sturdy jack or lift is essential.
- Socket set. There’s a variety of different sizes of bolts and nuts used, some metric, some not, depending on manufacturer. Make sure you’ve got a full set of the type your vehicle uses.
- Impact Driver. There are a few bolts that connect the wheel hub that are designed to be really, really tight. Depending on how long you’ve had your ATV, it might even feel stuck. An impact driver makes it easier to remove.
- Hammer/Mallet.
- EZ Greaser. Although it’s not essential, it’s a real time-saver during regular maintenance. EZ Greasers allow you to service your wheel bearings without removing the wheelshaft.
With these tools, you’ll be set to start replacing or servicing your wheel bearings from home.
If you’ve performed regular maintenance and greasing, checked the wheel for wobbles, replaced the bearings, and you’re still suffering from a shaky ride, it might not just be the bearings. You may need new wheels.
A dented ATV rim can give a lot of the same symptoms as a bad wheel bearing. Get back to a better riding ATV with the highest quality ATV wheels available at High Lifter. With the widest variety of sizes and styles around, find your perfect wheels with High Lifter today.